
Italian Bread Recipe: The smell of freshly baked Italian bread can make any kitchen feel cozy. I remember watching my grandmother knead dough with her hands. She made magic with simple ingredients.
Making homemade Italian bread is more than baking. It’s about connecting with tradition, sharing love, and making memories. These memories stay with us long after the bread is gone.
Your journey to making authentic Italian bread starts here. This guide is for both new and experienced bakers. You’ll learn to make two delicious loaves that will wow everyone. The recipe is easy, needing just basic ingredients and a bit of patience.
Understanding Traditional Italian Bread
Italian bread is more than just food; it’s a journey through culture and diversity. The art of making bread in Italy is a blend of tradition and flavor. It has won the hearts of food lovers everywhere.

Brief History of Italian Bread Making
The history of Italian bread is long and rich. Each region has its own special way of making bread. It’s not just about cooking; it’s a way to show off local ingredients and traditions.
- Ancient Romans started advanced bread-making techniques
- Regional breads came from local wheat and water
- Bread became a big part of Italian life and food
Key Characteristics of Authentic Italian Bread
Real Italian bread is known for its crisp outside and soft inside. It uses simple, top-quality ingredients. This makes the bread taste amazing.
« Great bread is the most fundamentally satisfying of all foods. » – Angelo Pellegrini
Different Types of Italian Bread
Italian bread comes in many forms, each from a different region. Some famous ones are:
- Ciabatta: A light, airy bread with big holes
- Focaccia: A rich, olive oil bread
- Pane Toscano: A bread without salt, with a special history
- Pane di Altamura: A strong bread made from durum wheat
- Grissini: Thin, crispy breadsticks great as snacks
Learning about these breads helps us see the beauty of Italian bread-making. Each bread has its own story, from its region to the bakers who make it.
Essential Ingredients and Equipment

Making authentic Italian bread starts with knowing the key ingredients and the right tools. Your journey to making perfect homemade bread begins with getting the best ingredients. These ingredients turn simple items into a tasty loaf.
Italian Bread Recipe: Essential Ingredients
- All-purpose flour (5 cups or 600g)
- Active dry yeast (½ tsp)
- Warm water (between 100°F and 110°F)
- Salt
- Sugar
The magic of Italian bread is in its simplicity. Each ingredient is important for flavor and texture. Precision matters when measuring to get consistent results.
Bread-Making Equipment
| Equipment | Purpose |
|---|---|
| Pizza Stone | Creates crispy crust and even heat distribution |
| Broiler Pan | Generates steam for perfect bread texture |
| 9×13-inch Baking Pan | Provides additional moisture during baking |
| Large Mixing Bowl | Allows dough to rise and develop flavors |
« The secret to great Italian bread is in the quality of ingredients and patience during preparation. »
You don’t need to spend a lot on equipment. Many home bakers use common kitchen tools to make amazing bread. The important thing is knowing how each tool helps in making the bread.
Water temperature is key when working with yeast. Water between 100°F and 110°F activates the yeast right. This ensures a good rise and a delicious loaf.
Italian Bread Recipe: Step-by-Step Instructions
Making authentic Italian bread needs patience and careful steps. It turns simple ingredients into a tasty loaf. This process is key to making a culinary masterpiece.

Mixing and Kneading the Dough
Begin by getting top-notch ingredients. You’ll need about 3 cups of all-purpose flour, 1 tablespoon of active dry yeast, and warm water. The temperature should be between 110°F to 115°F. Kneading is vital for making the dough smooth and right.
- Activate yeast in warm water (5 minutes)
- Mix dry ingredients thoroughly
- Combine wet and dry ingredients
- Knead for 6-8 minutes until smooth
First and Second Rise Times
The magic happens during the rising. Your dough will double in size in about 1 hour in a warm place. Bakers say keeping the temperature around 95°F helps a lot.
- First rise: 1 hour at 95°F
- Punch down the dough
- Shape the bread
- Second rise: 30-45 minutes
Shaping and Scoring Techniques
Shaping is where your dough turns into real Italian bread. Use soft motions to make the surface tight. This helps the crust look great. Scoring the top lets steam out, making those rustic patterns.
« The art of bread making is in the details of technique and patience. » – Italian Baking Tradition
Remember, the more you practice, the better you’ll get. Each loaf is a step closer to making authentic Italian bread at home.
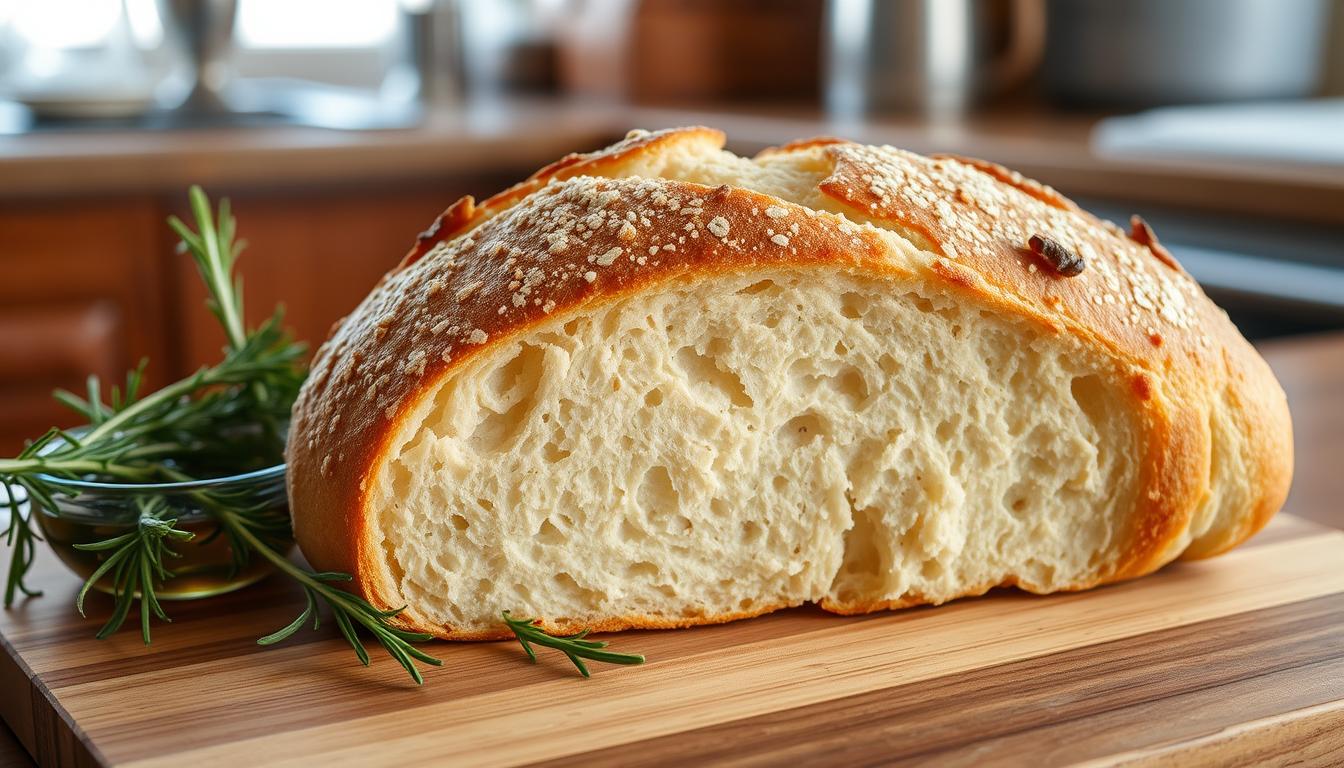
Italian Bread Recipe: The Perfect Crust and Texture
Making the perfect Italian bread crust is all about precision and knowing your baking science. The key to authentic Italian bread is its crispy outside and soft inside. This turns a simple loaf into a true culinary delight.
« A great bread crust is the signature of a true baker’s skill. » – Professional Baker’s Wisdom
To make a crusty bread, you need to master a few key techniques:
- Generate steam in the oven to develop a crisp Italian bread crust
- Control oven temperature for optimal bread texture
- Use high-hydration dough for better crust formation
The science of bread texture is all about protein and moisture. The crumb of your bread depends on gluten and how well you knead it.
| Crust Characteristic | Ideal Condition |
|---|---|
| Moisture Level | High hydration (65-75%) |
| Oven Temperature | 450-475°F |
| Steam Exposure | First 15-20 minutes of baking |
Professional bakers say using a Dutch oven or baking stone is key. These tools help make a crust that’s crispy and golden, yet soft inside.
Getting your Italian bread crust right takes practice and patience. With time, you’ll learn to make bread that rivals the bakery’s.
Italian Bread Recipe: Tips for Achieving the Best Rise
Mastering bread proofing is key to making perfect Italian bread. The fermentation process affects the bread’s texture, flavor, and quality. Knowing how to make dough rise better can change your baking game.
Temperature Control for Optimal Fermentation
Yeast grows best in certain temperatures. For great bread fermentation, keep the area at 70-75°F (21-24°C). Cooler temps slow yeast, while warmer ones can over-proof the bread.
- Room temperature is ideal for most bread rising
- Avoid drafty areas or direct sunlight
- Use a proofing box for consistent temperature
Proofing Methods to Enhance Flavor
There are different ways to proof bread, each improving taste and texture. Two main methods are:
- Room Temperature Proofing: Takes 8 hours to double in size
- Refrigerator Proofing: Offers 12-15 hours of slow fermentation
« Patience is the secret ingredient in bread making. » – Artisan Baker
Troubleshooting Common Rising Problems
Bread proofing can be challenging. Look out for these signs for perfect results:
- Under-proofed dough feels dense and doesn’t rise fully
- Over-proofed dough becomes flat and loses structure
- Use the « poke test » to check dough readiness
Professional bakers suggest the windowpane test. Gently stretch a small dough piece. If it stretches thin without breaking, your dough is ready to bake.
Baking Techniques and Temperature Control
Mastering bread baking techniques needs precision and knowing the right oven temperature. Italian bread baking is all about temperature and timing. This ensures a perfect golden crust and soft inside.
Before baking your Italian bread, preheat your oven to 450°F (232°C). Do this at least 30 minutes before. This creates a hot environment for your bread to get its crisp exterior.
« The secret to great bread is not just in the ingredients, but in the baking technique. » – Professional Baker’s Wisdom
Key Baking Techniques
- Preheat a dutch oven or baking stone for optimal heat distribution
- Use a spray bottle to create steam during the first 15 minutes of baking
- Rotate the bread halfway through baking for even browning
Temperature Guide for Perfect Bread
| Baking Stage | Temperature | Duration |
|---|---|---|
| Initial Baking (Lid On) | 450°F (232°C) | 15 minutes |
| Final Baking (Lid Off) | 450°F (232°C) | 15-20 minutes |
To see if your bread is done, use an instant-read thermometer. It should read between 190°F to 210°F (88°C to 99°C). A golden-brown crust and a hollow sound when tapping the bottom also mean it’s perfectly baked.
Remember, every oven is different. Try different techniques to find what works best for your kitchen.
Italian Bread Recipe: Storage and Freezing Methods
Storing your freshly baked Italian bread right keeps its taste and texture fresh. It’s key to keep your homemade loaf’s quality up and prevent it from getting stale too soon.
There are several ways to store Italian bread, depending on how fast you want to eat it. Knowing the best storage methods lets you enjoy your bread at its peak.
Room Temperature Storage
For short-term storage, room temperature is best. Here are some tips for keeping your bread fresh:
- Store bread in a bread box or paper bag
- Keep the bread cut-side down on a cutting board
- Avoid plastic bags, which can make the crust soggy
- Consume within 2-3 days for optimal taste
« A well-stored bread is a delicious bread! » – Artisan Baker’s Wisdom
Freezing Homemade Bread
Freezing homemade bread is a great way to make it last longer. Here’s how to freeze your bread perfectly:
- Allow bread to cool completely before freezing
- Wrap the bread tightly in plastic wrap, then in aluminum foil
- Place wrapped bread in a freezer-safe bag
- Store for up to 3 weeks
To thaw your frozen bread, let it sit at room temperature. Then, warm it up in a 350°F oven for 5-10 minutes. This will bring back its crispy crust.
Storage Considerations
Environmental conditions can impact bread storage. In humid places, watch out for moisture. In dry areas, avoid drying out the bread too much.
Serving Suggestions and Pairings
Your homemade Italian bread is a versatile culinary treasure. It can turn ordinary meals into extraordinary experiences. Italian bread pairings offer countless delicious possibilities to elevate your dining pleasure.
Classic serving suggestions for Italian bread include:
- Dipping in high-quality extra virgin olive oil and balsamic vinegar
- Creating bruschetta with fresh tomatoes, garlic, and basil
- Serving alongside soups and stews
- Making gourmet sandwiches
When exploring bread and meal combinations, consider these delightful options:
| Dish | Recommended Pairing |
|---|---|
| Pesto | Toasted Italian bread slices |
| Hummus | Lightly grilled bread rounds |
| Salmon Cream Cheese Spread | Warm, crusty bread triangles |
Pro tip: Warm your Italian bread slightly before serving to enhance its aroma and texture. A quick toast can transform your bread from good to extraordinary!
« Bread is the king of the table and all else is merely an accompaniment. » – Unknown Chef
Experiment with different serving techniques to discover your favorite way of enjoying this delicious homemade bread. Whether you’re hosting a dinner party or preparing a quick lunch, your Italian bread will be the star of the meal.
Conclusion
Your journey into bread-making has turned a simple recipe into a true art. Making homemade Italian bread is more than mixing ingredients. It’s about connecting with traditional baking that spans generations.
Each loaf you bake is a personal victory, beyond the kitchen. It shows your growth and skill.
The benefits of homemade Italian bread go beyond taste. You’ll save money, choose better ingredients, and feel proud of your creations. This skill lets you try new things and improve your baking.
Bread-making is a journey that never ends. With time, you’ll get better at understanding dough and flavors. Your effort will pay off with delicious, healthy bread.
Every loaf is a chance to get better. The joy of baking a perfect Italian bread is unmatched. It shows your growing skills and love for homemade food.